Hops Currently Available In Store
Please visit our facebook account to see updates about new hops that have been recently addeded
Pellet Hops (1oz)
Amarillo
Apollo
Azacca
Belma
Bravo
Callista
Cascade
Cashmere
Centennial
Challenger
Chinook
Citiva
Cluster
Columbus (CTZ)
Comet
Crystal
Czech Saaz
Elani
El Dorado
Falconer’s Flight
Fuggle
Galaxy
Galena
UK Golding
Hallertau Blanc
Hallertau Mittlefruh
Herkules
Hersbrucker
Huell Melon
Idaho 7
Idaho Gem
Krush
Lemon Drop
Liberty
Loral
Lotus 1
Magnum
Mandarina Bavaria
Mosaic
Motueka
Mt Hood
Nectaron
Nelson Sauvin
Nobility
Northern Brewer
Nugget
NZH 214
Perle (German)
Riwaka
Czech Saaz
Sabro
Saphir
Select (German)
Simcoe
Spalt (German)
Sterling
Strata
Styrian Golding
Summit
Superdelic
Tettnang
Tradition (German)
Vic Secret
Wakatu
Warrior
Willamette
Zamba
Zappa
Zythos
Cryo Pellet Hops (1oz)
Amarillo
Cascade
Citra
Idaho 7
Simcoe
Mosaic
Sabro
Simcoe
Pellet Hops (8 oz)
Amarillo
Cascade
Centennial
Chinook
Citra
Columbus
Fuggle
Galaxy
UK Golding
German Hallertau
Magnum
Mosaic
Nectaron
Czech Saaz
Tettnang
Pellet Hops (1 lb)
Amarillo
Cascade
Centennial
Chinook
Citra
Columbus
UK Golding
German Tettnang
German Hallertau
Czech Saaz
Simcoe
Willamette
Hop Shot (10 ml)
Hop Shot 1 – Cascade and Willamette
Hop Shot 2 – Centennial
Hop Shot 3 – Columbus
Grow Hops at Home

Growing your own hops at home is fun and easy! Brewing a beer with hops you grew yourself adds another great layer to this hobby we love so much.
Pre-orders begin in February for hop rhizomes. We have multiple varieties that were chosen for their ability to grow well in our climate. Quantities are limited and will arrive in March/April.
Key Points
- Plant in spring, after last frost.
- Use cotton twine and anchor into the ground using stakes
- Hops are ready to harvest in late summer when they make a crunchy sound when squeezed.
- Quantity of Hops will increase every year, starting with less than 1lb in year one and and double each year after. Different variets of hops will produce different quantities and size of hops.
- Don’t cut any shoots in year one. Cut off all “Bull” shoots (purple color) in year two. Cut off most shoots to focus on 3-5 vines after year one.
- Dry your hops with a fan, if possible, for 24 hours. Vacuum seal and store in freezer.
Below is an article from BeerSmith.com that describes the process and shows just how easy it can be.
Location for Growing Hops
Select an area with plenty of sun. Hops need at least 6-8 hours of sun a day, so the South facing side of your home or an exposed site is a good location. Hop vines (called bines) can grow to over 25 feet and weigh over 20 pounds, so vertical space for a trellis is important as well.
Hops prefer well-aerated soil that is rich in nutrients and has good drainage. If you are going to plant several varieties, keep them well separated in your garden. Hop roots will spread quickly and take over the garden unless you separate them and trim the roots each season.
Hop Planting and Care
Hops should be planted in the Spring, late enough to avoid a frost. Fertilize liberally before planting. Plant your hops in a mound and aerate the ground by turning it over several times to aid drainage, enhance growth and prevent disease. Place the rhizomes about 4 inches deep, and make your mound of soil about a foot high to aid drainage. Place the root side of the rhizome down. Cover the mound with some straw or light mulch to inhibit the weeds.
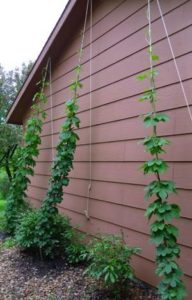
The hop bines grow vertically and require some kind of trellis. Your trellis could some heavy rope or twine going from ground level to your roof, or a few poles securely mounted in the ground. If using rope, select rough twine-like rope so the bines can grab onto it. Keep in mind that the hop bines can be 25+ feet long and weigh 20+ pounds. The trellis should be strong and secure.
Hops also enjoy lots of water and sunlight. In the dry climates or the heat of summer, they may need to be watered daily. Once the hops begins to grow, select the best bines and wrap them around your trellis to train them. You will need to train the hops for a few days, but eventually they will begin growing in a clockwise direction from east to west around your trellis. Train the best shoots and trim the rest off.
Harvesting and Drying your Hops
Your hops will continue to grow throughout the summer, and will be ready to harvest by late summer. The harvest in the first year may not be huge, and in fact it could be very small – hops don’t reach peak yield in the first year.
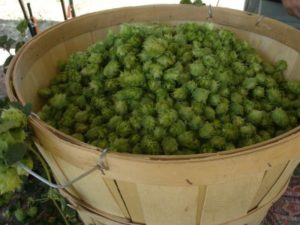
To determine when to harvest, you need to examine the cones. Mature hop cones will be dry to the touch, springy, have a very strong aromatic hop odor, and leave yellow lupulin powder on your fingers. Check the cones every day or two, and when you think they are ripe, pick one and open it. It should be filled with thick yellow-gold lupulin powder if it is fully ripened.
The hops may not all ripen at once, but you need to harvest each as it ripens. Dry the hops out in a warm dry spot in your house, and keep them away from sunlight. Sunlight can seriously damage picked hops. A paper bag is a good place to store them while drying. The hops should dry out in a week or two. After that, place them in a sealed bag and store the hop cones in your freezer. Remove as much oxygen as possible from the bag to avoid oxidization.
Maintenance of Your Hops
Cut the bines back to 3 feet or so after harvesting. The winter frost will kill off the bines, after which you can cut them back further and cover them until Spring. When Spring comes, take a spade and cut around the rhizome to trim the roots back to about a foot. Trimming the roots will prevent the hops from consuming your entire garden, as they tend to spread rapidly. Add some fertilizer, fresh mulch and a new trellis and you will be ready to grow hops for a fresh new season.
For a little more in depth information please check out this link.
A properly cared-for hops garden will keep you in fresh hops for years to come.
Note: Hops can be dangerous for dogs to consume so please don’t feed your pets hops.
